AssetIT is an Asset management solution for Jira that provides a powerful solution for managing IT assets within Jira. It is designed to track hardware, software, and cloud assets. One of AssetIT’s main features is the ability to link an asset to a Jira issue, which can make work much easier for Jira users. In this blog post, we will take a closer look at how to link an asset to a Jira issue using AssetIT. By the end of this post, you will better understand how AssetIT can help you manage your IT assets more efficiently and effectively within Jira.
There are two ways to link an asset to a Jira issue.
Approach 1: Link Assets Using the External Asset Platform Field.
Until December 31, 2024, your current data in Atlassian’s External Asset Platform custom field will be synced to our Linked Assets Panel for seamless use. However, this is a one-way transfer, as the External Asset Platform field is scheduled for shutdown.
We recommend starting with our Linked Assets Panel now to ensure continued asset management without interruption.
One of the first steps in linking an asset to a Jira issue using AssetIT is to add an Asset custom field to your Jira project. An Asset custom field is a type of field that allows you to select an asset from a list of assets and associate it with a Jira issue.
To add additional asset fields to a Jira project, follow these steps:
- Go to the Jira project where you want to add the additional asset field.
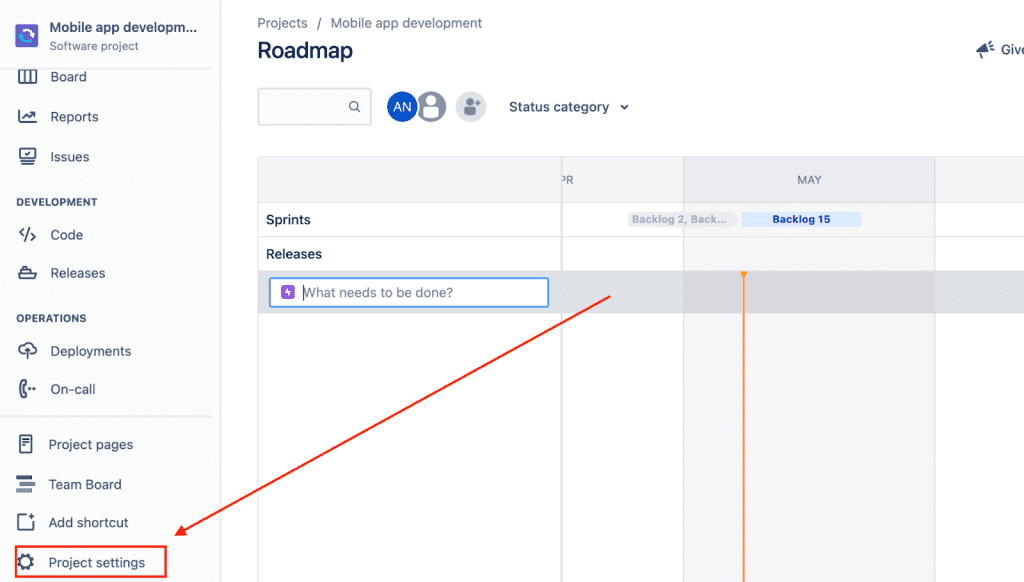
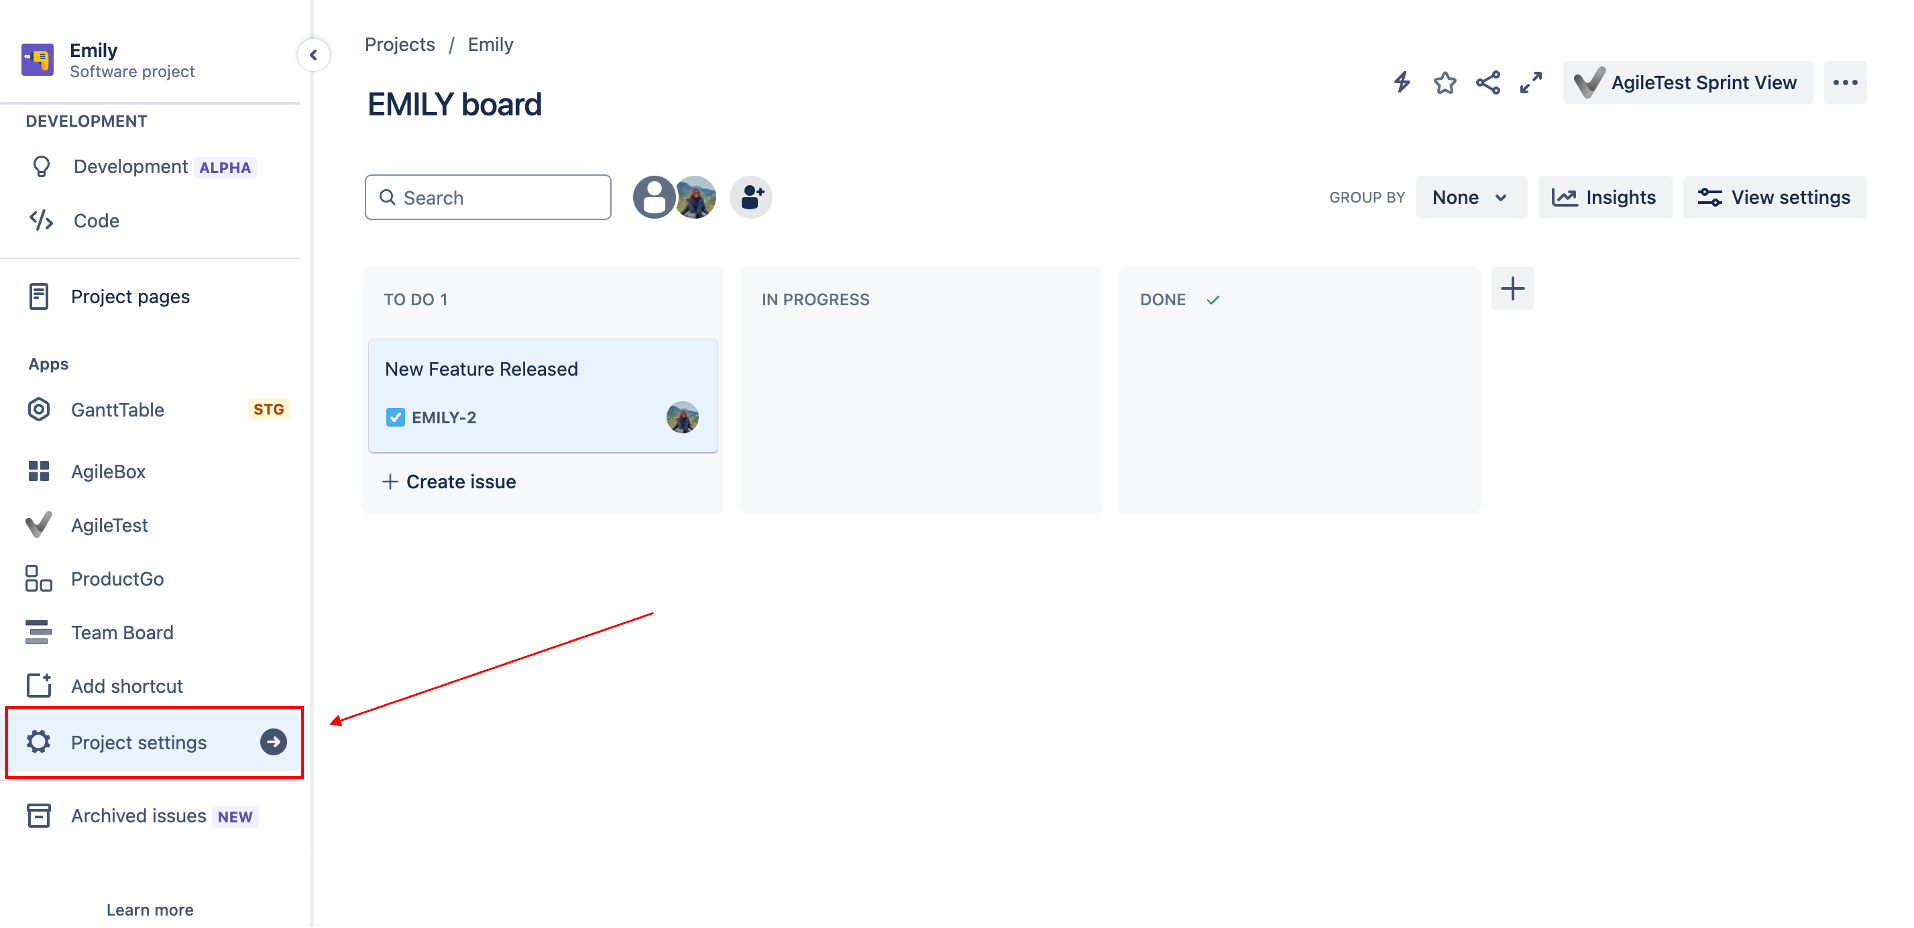
- In the sidebar, click on “Project Settings.”
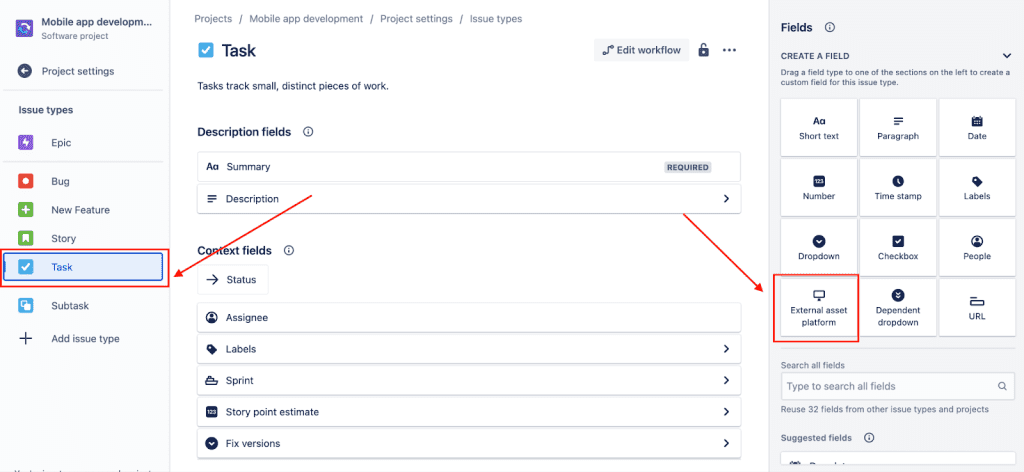
- Under “Issue Types,” select the “issue type” that you want to add the asset field.
- At the “Fields” section and search for “External Asset Platform”, drag and drop it to “context fields”
- Enter a name and description for the field.
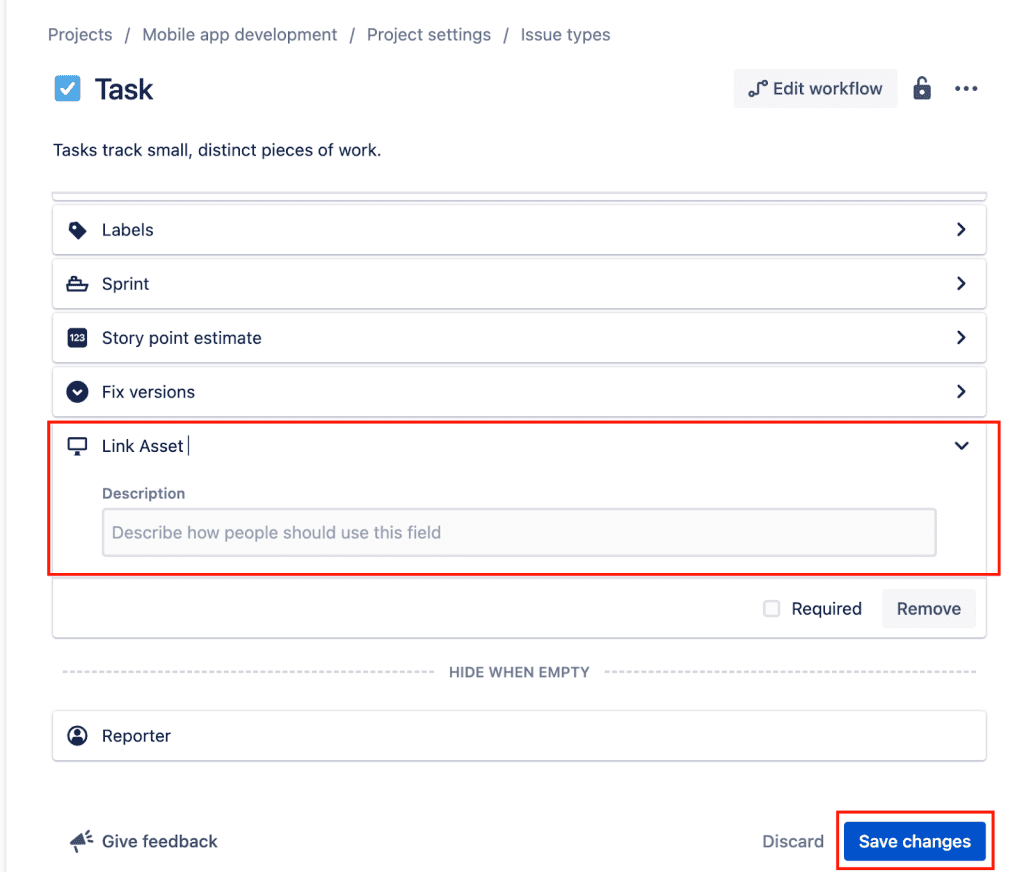
- Save your changes.
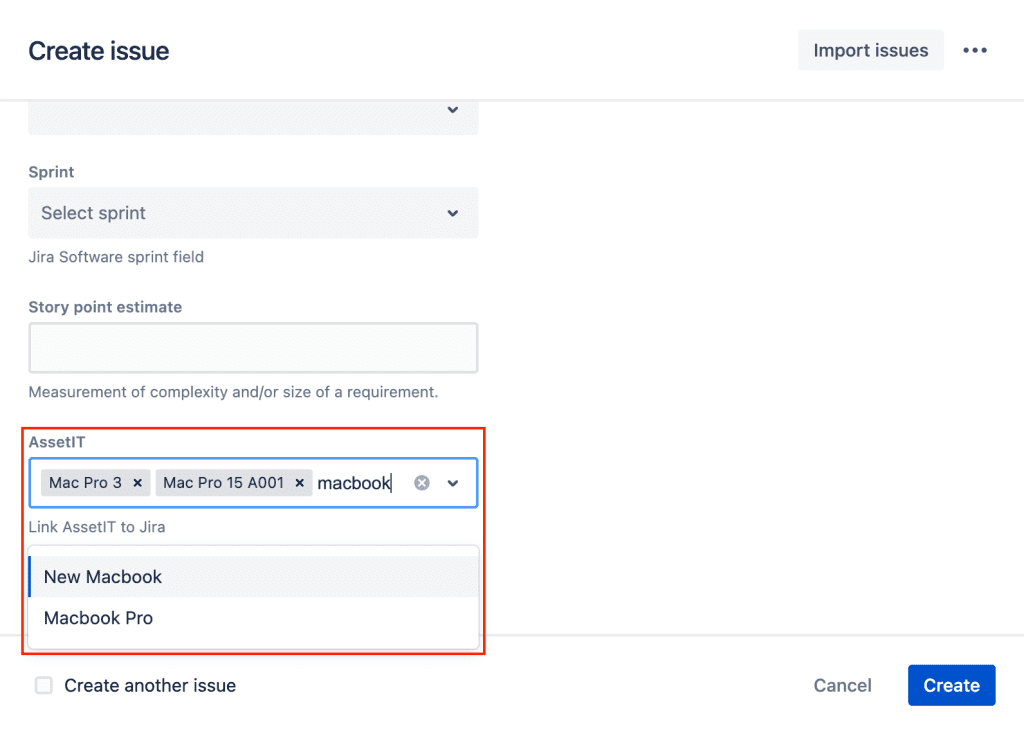
Once finish, you can open the Asset field from the Create Issue dialog. Or, open it from the right panel of the issue details screen. This allows you to view and manage the asset’s details and status directly within Jira.
From Create Issue
From the Asset field, search and select one or multiple assets by names
On the right panel
Click on Link asset to open the panel, search for an asset by name and add to the issue
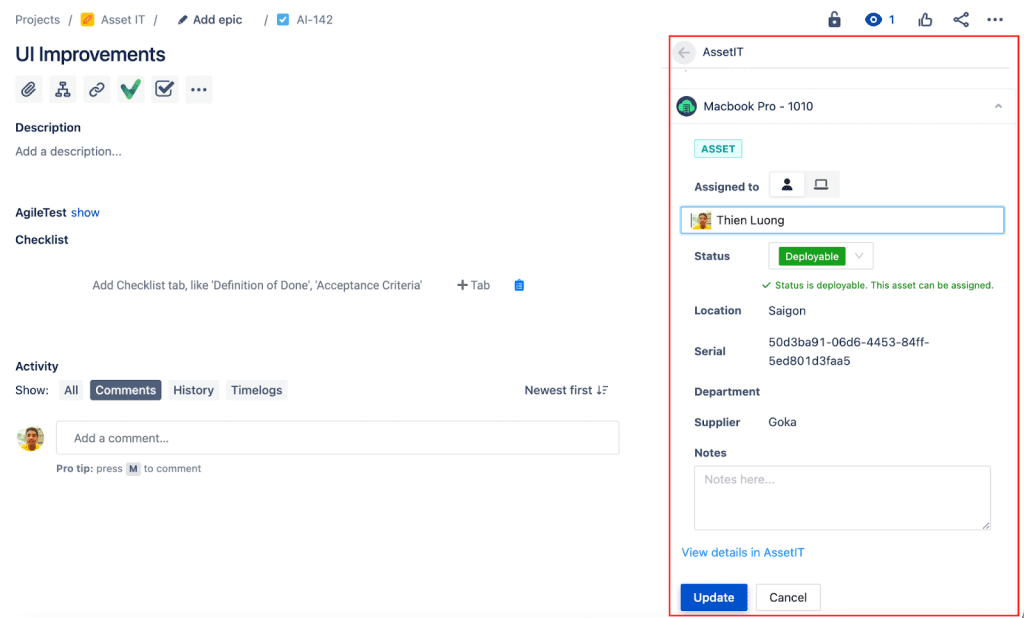
Approach 2: Link an Asset to a Jira issue Using AssetIT Built-in Panels
Jira Issue Panels allow you to configure and customize the AssetIT panels displayed in your Jira issues. These panels help streamline asset management directly within Jira, providing access to essential AssetIT resources and tools. Only Jira Project Admins can enable and configure AssetIT Panels.
By default, AssetIT panels are disabled. To activate them for your project, follow these steps:
For Jira Software and Business Projects
Go to the Jira project where you want to add AssetIT panels.
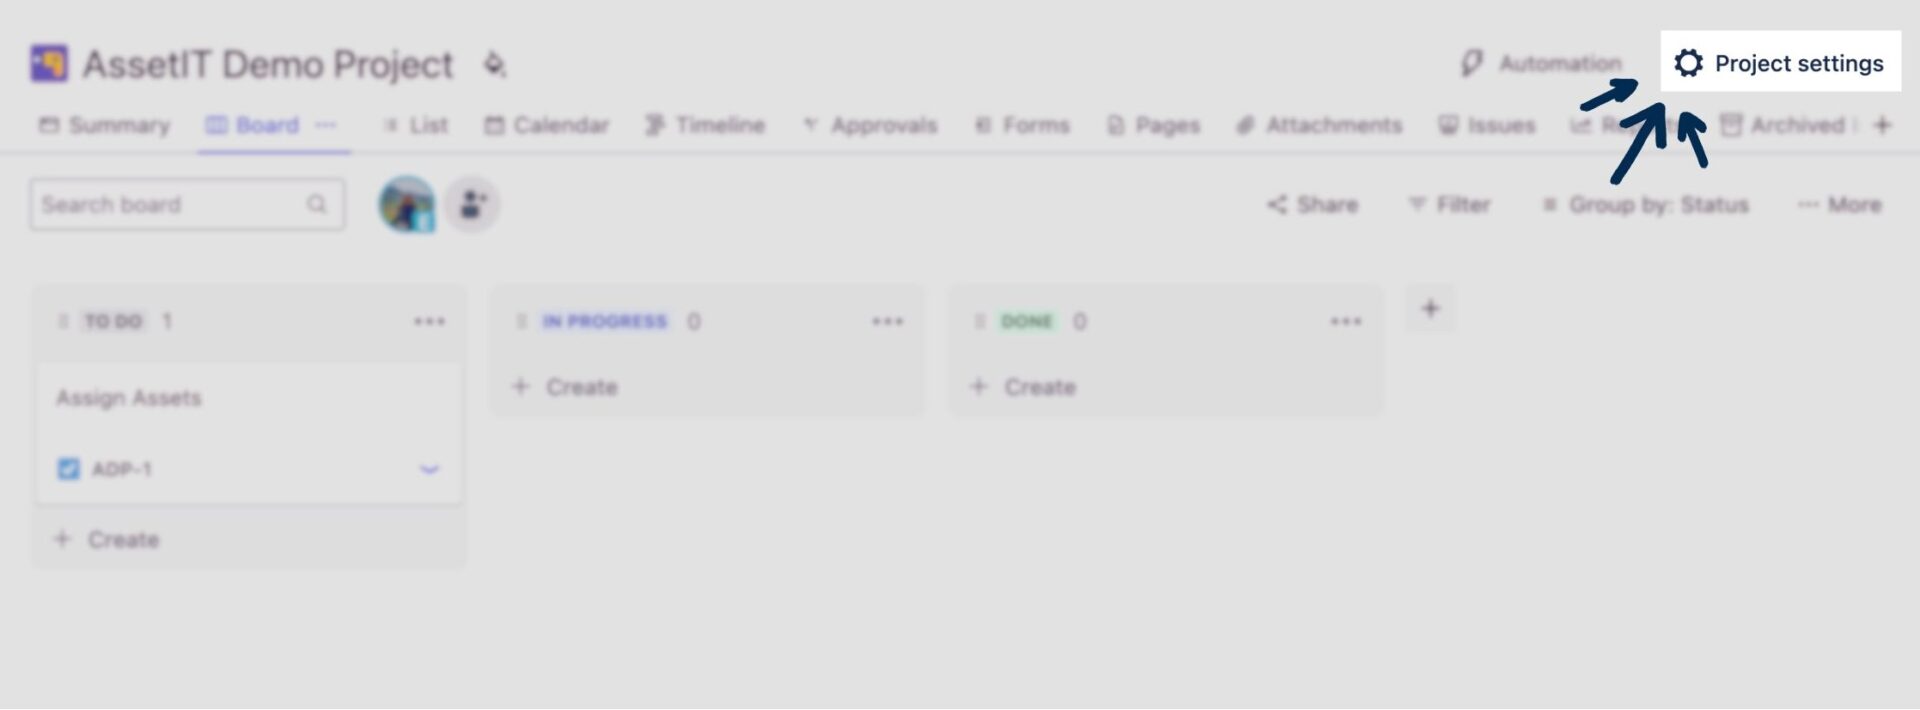
In the project view, click on Project Settings at the bottom of the left sidebar.
Access AssetIT Integration
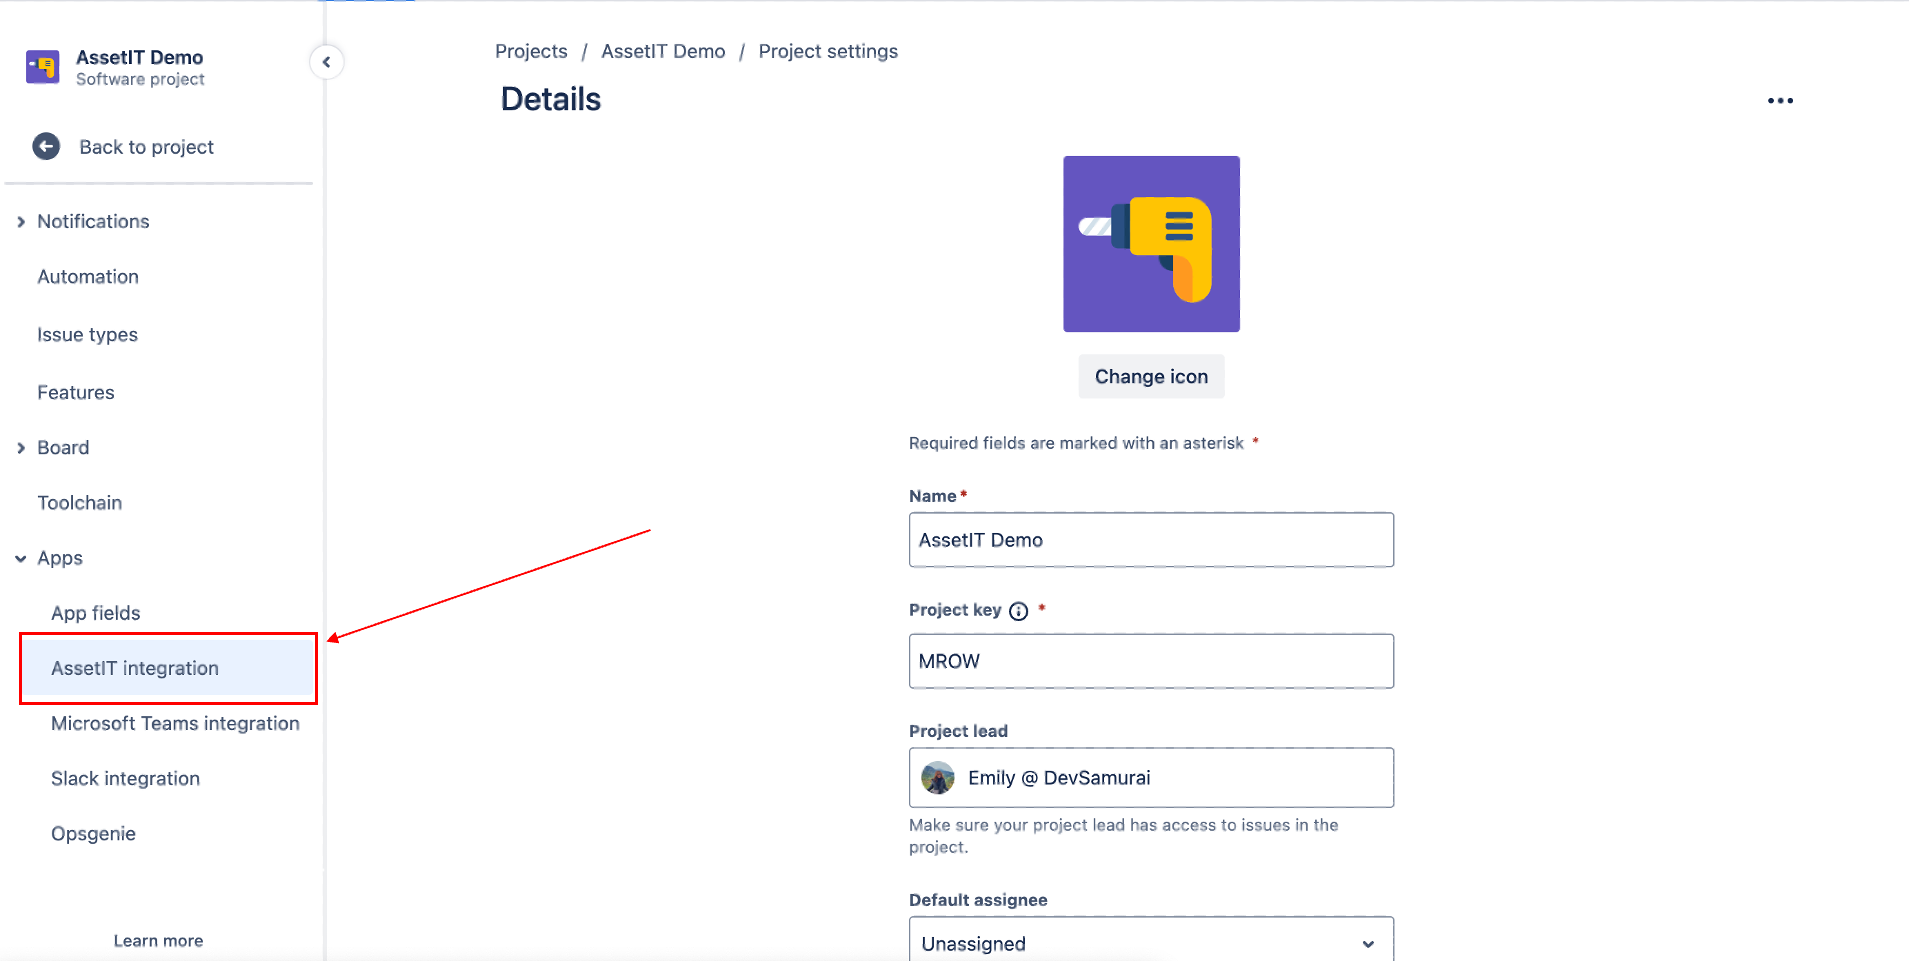
In Project Settings, scroll to the Apps section on the left sidebar.
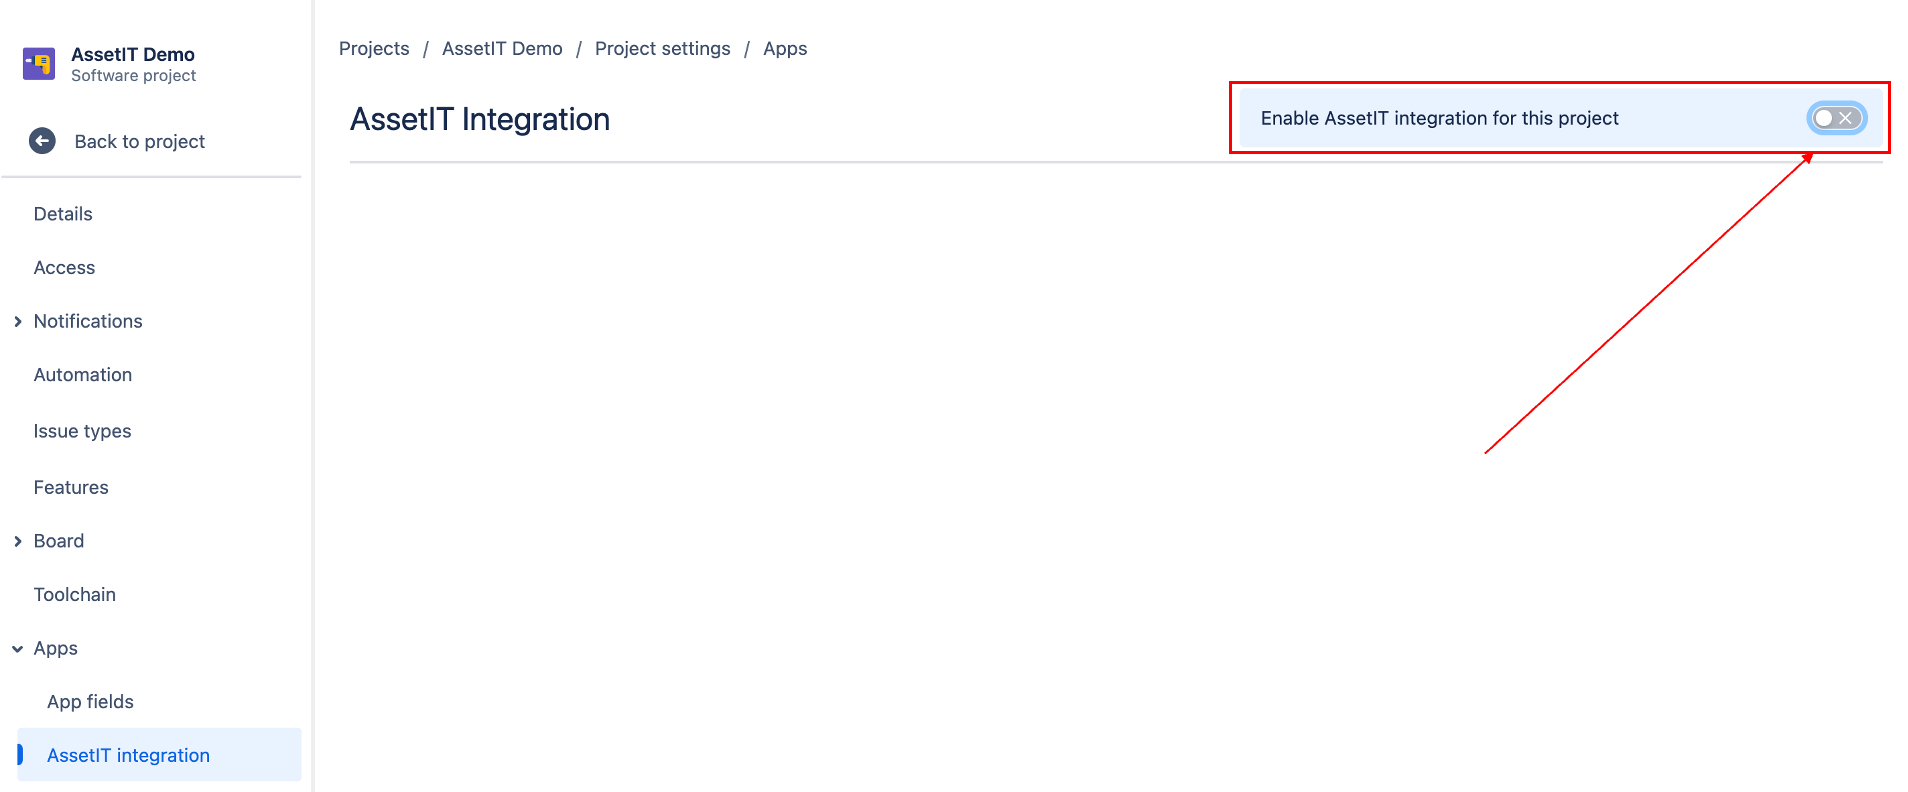
- Click on AssetIT Integration

Enable AssetIT Integration
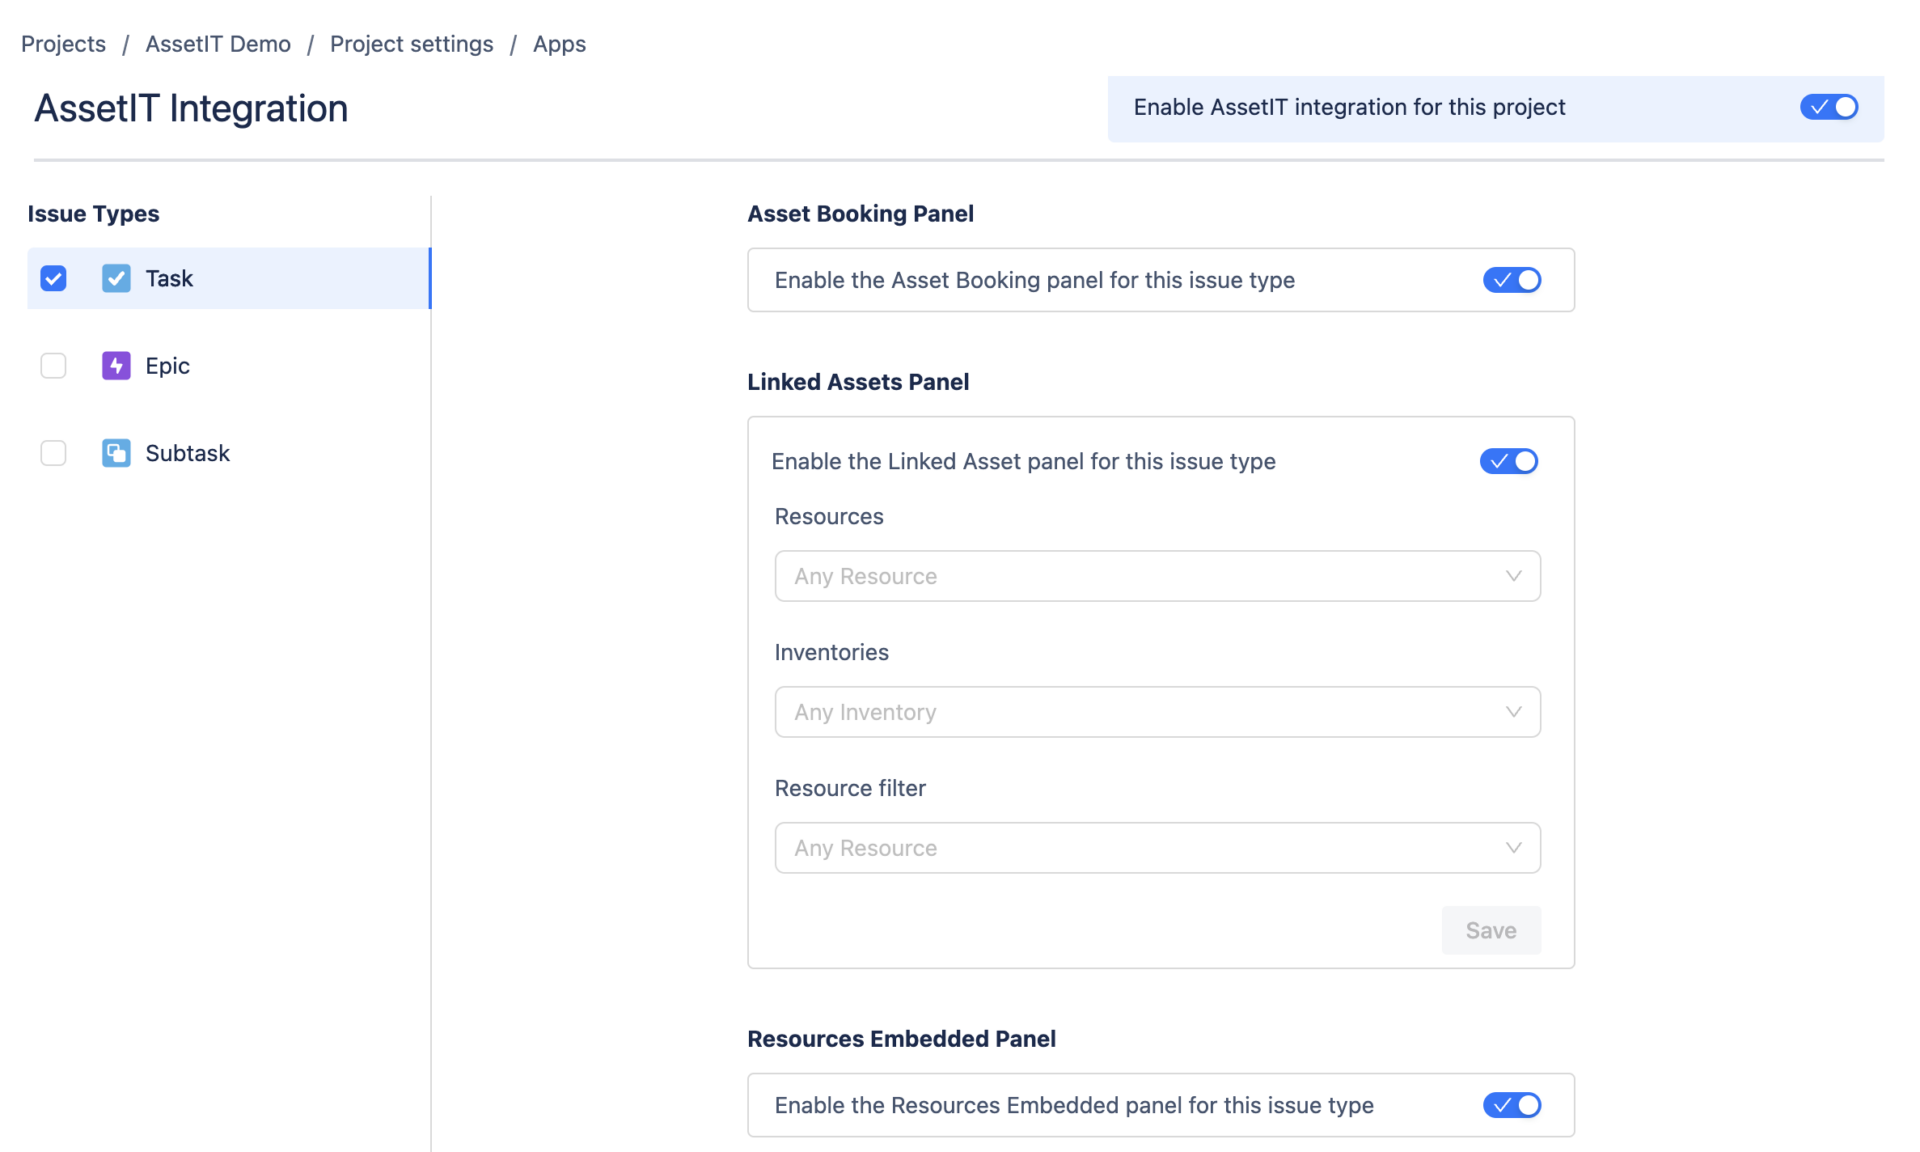
In the AssetIT Integration settings, toggle on Enable AssetIT integration for this project to activate the panels for this project.
Selecting Issue Types for Configuration
- On the left side of the AssetIT Integration screen, you’ll see a list of Issue Types (e.g., Task, Epic, Subtask). Use this section to select which issue types you want to configure for AssetIT panels.
- On the left side of the AssetIT Integration screen, you’ll see a list of Issue Types (e.g., Task, Epic, Subtask). Use this section to select which issue types you want to configure for AssetIT panels.

- Check the box next to each issue type where you want the AssetIT panels to be enabled. Only the selected issue types will display the configured panels in their Jira issues.
- Field Configuration
Resources: Choose the resource type(s) you want to display in this panel. Options include 5 resource types: Assets, Accessories, Licenses, Components, Consumables. If left blank, it will show all available resources.
Inventories: Select the inventory(ies) you want this panel to display resources from. If left blank, it will display resources from all inventories.
Resource Filter:
Only show available/unassigned resources: Displays resources that are not currently assigned to anyone.
Only show resources of the reporter: Displays resources assigned specifically to the Issue Reporter.
Only show resources of the assignee: Displays resources assigned to the user currently assigned to the issue.
For Service Projects
Open the Jira Service project where you want to configure the AssetIT panels.
Click on Project Settings in the left sidebar.
Access AssetIT Integration
In Project Settings, scroll to the Apps section on the left sidebar.
Click on AssetIT Integration.
In AssetIT Integration, toggle on Enable AssetIT integration for this project at the top right. This activates the Linked Assets panel for the project.
Select Issue Types and Request Types
On the left side of the configuration screen, you’ll see a list of Issue Types specific to your service project, such as Ask a Question, Service Request, Email Request, etc.
- Expand each issue type to view its Request Types.
- Select the Request Type where you want the Linked Assets panel to be enabled.

- Field configuration:
Resources: Choose the types of resources (e.g., Asset, Accessory, license) that should be displayed in the panel. Leaving this blank will show all available resources.
Inventories: Select specific inventories if you want to display resources only from those inventories. If left blank, the panel will show resources from all inventories.
Resource Filter: This setting allows you to filter resources based on their availability or assignment:
Only show available/unassigned resources: Displays resources that are currently unassigned and available to be checked out.
Only show resources of the reporter: Shows resources assigned to the user who reported the issue (note: this is not applicable for external customers accessing the customer portal).
Only show resources of the assignee: Displays resources assigned to the user assigned to resolve the issue (note: this is also not applicable for external customers on the customer portal).
Conclusion
In conclusion, linking an asset to a Jira issue using AssetIT can greatly simplify your IT Asset Management process. By following the steps outlined in this blog, you can easily link an asset to Jira issues.




Recent Comments